Before measuring your roof for shingles, it’s important to know that the roof’s measurements have nothing to do with your home’s interior square footage. Instead, you should be focused on the roof’s surface area.
It’s always best to have a professional roofing company perform a detailed roof inspection and an expert measurement of your roof before purchasing shingles or other roofing materials. Some homeowners choose to do their own preliminary estimate, which is why it’s important to know how to get the numbers right.
With a few simple steps, you can begin preparing for your full roof replacement project by measuring your roof’s footprint, accounting for its pitch, and converting the result into roofing squares to determine how many bundles of shingles you will need.
Measuring for a Lifespan Shingles Roof Replacement
Measuring for new shingles roofing gives you a practical starting point for estimating material needs, comparing quotes from roofing contractors, and planning your budget. Most homeowners can calculate an approximate roof size from the ground or by using the home’s footprint and roof pitch.
Keep in mind that complex rooflines, steep slopes, dormers, valleys, and areas with penetrations can affect the final amount of materials needed to cover your full roof. Use your measurements as an estimate, then confirm the numbers with a roofing professional before ordering shingles or scheduling work.

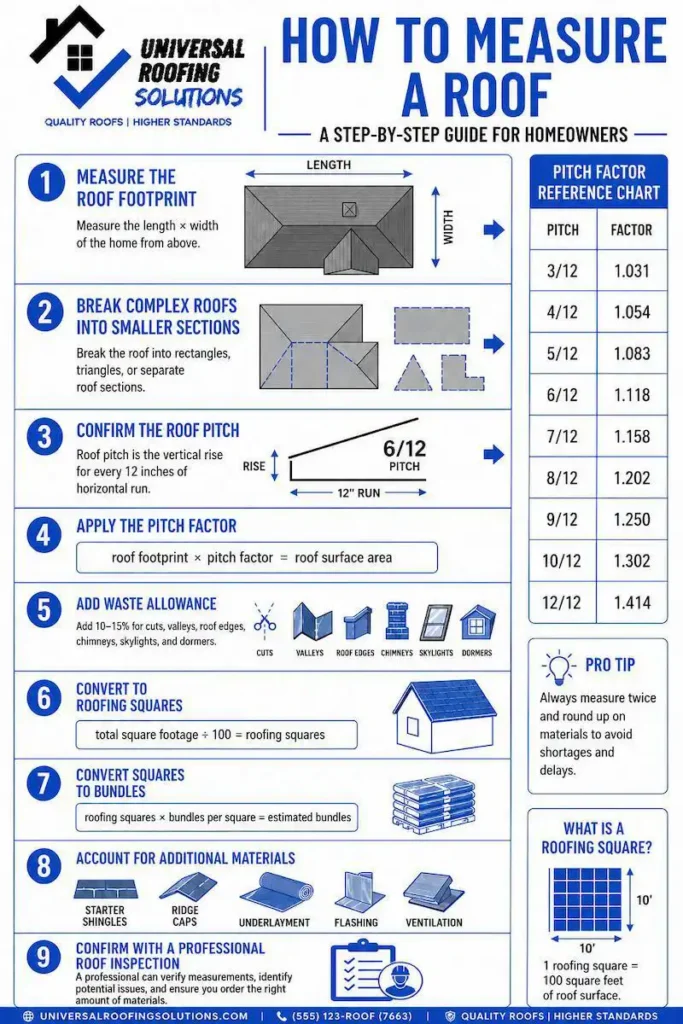
Step 1: Measure the Roof Footprint
Start by measuring the horizontal area covered by the roof, including overhangs. For a simple rectangular roof, multiply the exterior length by the exterior width.
Formula:
Length × width = roof footprint
Example:
40 feet × 30 feet = 1,200 square feet
Step 2: Divide a Complex Roof Into Smaller Sections
Roofs are not always one simple rectangle. If your home has an L-shaped layout, garage addition, bump-out, dormer, or multiple roof levels, you’ll need to measure each roof area separately instead of trying to calculate the entire roof’s dimensions at once.
Start by drawing a basic overhead sketch of the roof and divide it into manageable shapes, such as rectangles, triangles, or trapezoids. Write down the length and width of each section, and calculate the square footage for each one. Finally, add the totals together.
As you sketch, mark features that may affect the final shingle material estimate, including valleys, chimneys, skylights, ridge lines, and changes in roof height. You will account for roof pitch and extra material for cuts and waste after finding the total footprint area.
Step 3: Confirm the Roof Pitch
Roof pitch describes how many inches the roof rises vertically for every 12 inches of horizontal distance. For example, a 6/12 roof rises 6 inches for every 12 inches across.
This detail is important because a steeper roof has more surface area than the flat footprint beneath it. Use the chart below to convert the horizontal roof measurement into the actual area that needs shingles.
Step 4: Use the Pitch Factor to Find Roof Surface Area
Multiply the horizontal roof footprint by the factor that matches the roof pitch.
Formula:
Roof footprint × pitch factor = estimated roof surface area
Example:
A roof with a 1,200-square-foot footprint and a 6/12 pitch would be calculated as 1,200 × 1.118 = 1,342 square feet of roof surface.
That 1,342-square-foot figure is the starting point for estimating shingle coverage. The next step is to add material for cuts, waste, valleys, roof edges, and other details.
Step 5: Add Material for Cuts and Waste
Roof shingles must be cut around valleys, roof edges, chimneys, skylights, vents, dormers, and other roof features. That means a roof should not be measured down to the exact bundle with no room for necessary cuts.
A simple gable style pitched roof may begin with an allowance of around 10 percent, whereas a roof with multiple valleys, steep sections, or several interruptions can require a larger allowance.
Formula:
Roof surface area × waste allowance = estimated shingle coverage area
Example:
1,342 square feet × 1.10 = 1,476 square feet
After adding a 10 percent waste allowance, this example roof requires an estimated 1,476 square feet of shingle coverage.
Step 6: Convert Square Footage Into Roofing Squares
Roofers commonly measure shingles in “squares.” One roofing square equals 100 square feet of roof surface.
Formula:
Estimated shingle coverage area ÷ 100 = roofing squares
Example:
1,476 ÷ 100 = 14.76 squares
Round up for planning purposes. This example roof would be estimated at approximately 15 roofing squares.
Step 7: Convert Roofing Squares Into Shingle Bundles
The number of bundles needed per square depends on the product. Many standard architectural roof shingles, including CertainTeed’s Landmark roof shingles, are packaged at three bundles per square, but packaging and coverage can vary by manufacturer and shingle product line.
For a product that requires three bundles per square:
15 squares × 3 bundles per square = 45 bundles
Step 8: Account for Materials Beyond Field Shingles
Field shingles cover the main roof surface, but they are not the only materials needed for a complete re-roofing project. A roof measurement should also lead to a separate estimate for the components that protect edges, transitions, and vulnerable areas.
Depending on the roof, your material list for a full roof replacement may include:
- Starter shingles along eaves and rakes
- Ridge cap shingles for ridges and hips
- Underlayment beneath the shingles
- Ice and water protection where needed
- Flashing around chimneys, skylights, walls, and penetrations
- Ventilation materials
- Fasteners and sealants
These materials should be matched to the roof’s layout and the selected shingle roofing system. They are not typically included in a basic bundle calculation.
Step 9: Use a Calculator, Then Confirm the Final Takeoff
An online roofing calculator can help double-check the math after you have measured the footprint and identified the roof’s pitch. The Calculator.net Roofing Calculator is a general-purpose tool that estimates roof area and material needs.
An online roofing calculation should be used as a reference point, not as a final order list. A calculator cannot identify soft decking, damaged flashing, inadequate ventilation, or the actual amount of ridge cap and starter material needed like a real roofing professional can identify during your initial roof inspection.
When Your Roof Measurement Should Lead to a Roof Inspection
Measuring your roof can help estimate shingle quantities, but it can also reveal that the project may be more involved than a routine shingle replacement.
Signs the Roof May Need More Than New Shingles
A professional roof inspection is especially important when you notice measurement-related concerns alongside some of these common warning signs you need a new roof:
- Active leaks, ceiling stains, or moisture in the attic
- Curling, cracked, missing, or repeatedly repaired shingles
- Widespread granule loss in gutters or near downspouts
- Damaged flashing around chimneys, vents, skylights, or wall intersections
- Soft, sagging, or uneven areas along the roofline
- Wear concentrated around valleys, penetrations, or separate roof sections
Consider Roof Age Along With Its Condition
Understanding how long a roof lasts can help homeowners evaluate whether an older roof is still a good candidate for roof repairs like replacing shingles or your roof is nearing the point where a full roof replacement makes more sense.
A roof that is approaching the expected lifespan of its roof shingles, has needed frequent repairs, or shows widespread wear should be inspected before materials are ordered. A professional roofing contractor will confirm whether targeted roof repairs are realistic or whether a full replacement roof will provide a more dependable result long-term.
Schedule a Professional Roof Inspection and Roof Measurement Today
A DIY roof measurement can be helpful for early planning, but a professional measurement from a trusted local roofing company gives you a more dependable basis for your roofing project. At Universal Roofing Solutions, our roof contractors will evaluate your roof’s dimensions, pitch, valleys, flashing, ventilation, and assess for any visible signs of damage before recommending the right next step.
Schedule a roof inspection and measurement today by calling 973-908-0242 or filling out our contact form to get started with confidence.